Difference between revisions of "Tips for PHP"
Jump to navigation
Jump to search
Faiz.kwong (talk | contribs) |
Aina.Azidy (talk | contribs) |
||
| (One intermediate revision by one other user not shown) | |||
| Line 10: | Line 10: | ||
Password : password of your host. | Password : password of your host. | ||
| − | *After that go to your Advanced tab. At the default local directory: browse your respiratory > your path project file. '''Example : D:\ | + | *After that go to your Advanced tab. At the default local directory: browse your respiratory > your path project file. '''Example : D:\Repository\dev-test-web''' |
At the default remote directory: /public_html // This is the directory of the project in the server. | At the default remote directory: /public_html // This is the directory of the project in the server. | ||
Tick Use synchronized browsing. Tick directory comparison. // This is to compare whether there is changes in files or not. Yellow means the files not in either your workspace nor server. Green means changes that have been made. | Tick Use synchronized browsing. Tick directory comparison. // This is to compare whether there is changes in files or not. Yellow means the files not in either your workspace nor server. Green means changes that have been made. | ||
| Line 16: | Line 16: | ||
'''FileZilla is manual uploader to your server. For future, we will be using gitlab to synchronize with server db.''' | '''FileZilla is manual uploader to your server. For future, we will be using gitlab to synchronize with server db.''' | ||
| + | == 2. Download Project from CPanel using FileZilla == | ||
| − | == | + | 1. get credential of CPanel for the project<br /> |
| + | 2. Open FileZilla or any FTP<br /> | ||
| + | 3. Go to File -> Site Manager -> New Site<br /> | ||
| + | *On the right, at General tab:-<br /> | ||
| + | **Insert Host<br /> | ||
| + | **Select "Only use plain FTP" at Encryption<br /> | ||
| + | **Insert User and Password<br /> | ||
| + | *Go to Advance tab:-<br /> | ||
| + | **Browse the default local directory<br /> | ||
| + | ***!! Before browse make a new empty folder for the project<br /> | ||
| + | **write "/public_html" at default remote directory<br /> | ||
| + | **Tick on "Use synchronized browsing<br / > | ||
| + | 4. Click Connect<br /> | ||
| + | 5. On the right side press "ctrl + A" . Then right click and click Download<br /> | ||
| + | |||
| + | It will download into your project directory | ||
| + | |||
| + | |||
| + | == 3. Concept be used == | ||
*Flow for the php is example Index.php > test.controller.php > test.model.php ; User will click button and the function in controller will request ID or parameter from the model. '''Do not forget to save every time you make changes in file.php.''' | *Flow for the php is example Index.php > test.controller.php > test.model.php ; User will click button and the function in controller will request ID or parameter from the model. '''Do not forget to save every time you make changes in file.php.''' | ||
| Line 50: | Line 69: | ||
| − | == | + | == 4. Import SQL to Phpmyadmin == |
*Before import sql file into database. You need to create database first, example devtest_coredb. After that, click on your database name(devtest_coredb) and click import, ''''''Format for importing files is in sql or zip file. Example devtest_coredb.sql or devtest_coredb.zip.'''''' | *Before import sql file into database. You need to create database first, example devtest_coredb. After that, click on your database name(devtest_coredb) and click import, ''''''Format for importing files is in sql or zip file. Example devtest_coredb.sql or devtest_coredb.zip.'''''' | ||
| Line 58: | Line 77: | ||
</gallery> | </gallery> | ||
| − | == | + | == 5. References For PHP == |
*References for PHP can be use/search at https://www.w3schools.com/. In w3schools will show the PHP functions, Ajax functions and many more. | *References for PHP can be use/search at https://www.w3schools.com/. In w3schools will show the PHP functions, Ajax functions and many more. | ||
Latest revision as of 08:38, 25 November 2019
START HERE:
Contents
1. Install FileZilla
- After the installation, go to the file > site manager > Click My Sites > Click New Site > name it same as your host name Example : dev.test.valse.my.
Under the protocol: choose 'FTP- File Transfer Protocol'.
Encryption: choose'Only use plain FTP(insecure).
Logon type : choose 'Normal'.
User : username of your host.
Password : password of your host.
- After that go to your Advanced tab. At the default local directory: browse your respiratory > your path project file. Example : D:\Repository\dev-test-web
At the default remote directory: /public_html          // This is the directory of the project in the server.
Tick Use synchronized browsing. Tick directory comparison.     // This is to compare whether there is changes in files or not. Yellow means the files not in either your workspace nor server. Green means changes that have been made.
FileZilla is manual uploader to your server. For future, we will be using gitlab to synchronize with server db.
2. Download Project from CPanel using FileZilla
1. get credential of CPanel for the project
2. Open FileZilla or any FTP
3. Go to File -> Site Manager -> New Site
- On the right, at General tab:-
- Insert Host
- Select "Only use plain FTP" at Encryption
- Insert User and Password
- Insert Host
- Go to Advance tab:-
- Browse the default local directory
- !! Before browse make a new empty folder for the project
- !! Before browse make a new empty folder for the project
- write "/public_html" at default remote directory
- Tick on "Use synchronized browsing
- Browse the default local directory
4. Click Connect
5. On the right side press "ctrl + A" . Then right click and click Download
It will download into your project directory
3. Concept be used
- Flow for the php is example Index.php > test.controller.php > test.model.php ; User will click button and the function in controller will request ID or parameter from the model. Do not forget to save every time you make changes in file.php.
- For the comment, use proper ways to comment in the coding example
   // For downloading PDF invoice or other types of files.
   protected function Download()
   {
       if ($this->section=='main') {
           Helper::redirect404();
       } elseif ($this->section=='admin') {
           // Control Access
           Staff::Access(1);
   }
- In the gitlab, the important is in the Issues section. Click Issues, then there is sub under of it like; List, Boards, Labels, Milestones. Always check on List and Boards. Example in picture
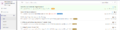
Kanban List
Kanban Boards
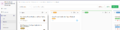
- Another tips, if the system have error such as HTTP 5000 or anything. You need to check error_log; check below
1.Check in Bitnami Wamp manager > Configure > Open Error Log > Search for Fatal Error.
2.Check in error_log in system(If the system has the error_log function).
Below is the picture
Error Log on Bitnami

Error Log on system


4. Import SQL to Phpmyadmin
- Before import sql file into database. You need to create database first, example devtest_coredb. After that, click on your database name(devtest_coredb) and click import, 'Format for importing files is in sql or zip file. Example devtest_coredb.sql or devtest_coredb.zip.'
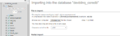
Import sql file into database
5. References For PHP
- References for PHP can be use/search at https://www.w3schools.com/. In w3schools will show the PHP functions, Ajax functions and many more.