Difference between revisions of "How To Use Gitlab Push, Pull And More"
Jump to navigation
Jump to search
Faiz.kwong (talk | contribs) (Created page with "START HERE : == 1. Open Git Bash == We assume that you have Gitlab account and have install Git. Open Git Bash. Do all these in Git Bash command prompt: Example with pictu...") |
Faiz.kwong (talk | contribs) |
||
| Line 6: | Line 6: | ||
Open Git Bash. Do all these in Git Bash command prompt: | Open Git Bash. Do all these in Git Bash command prompt: | ||
| − | Example with picture | + | Example with picture below |
<gallery> | <gallery> | ||
| − | Gitbash cmd.png| | + | Gitbash cmd.png|Git Bash Command Prompt |
</gallery> | </gallery> | ||
| − | + | The command for Git Bash: | |
| − | |||
| − | |||
| − | + | 1. First, config your git credential: | |
| − | git | + | git config --global user.name “John Doe” // Follow your Gitlab username |
| − | + | git config --global user.email johndoe@valse.com.my // Follow your Gitlab email/valse email | |
| − | + | Click enter. | |
| − | + | 2. Then checkout git repository of our project(in Gitlab): | |
| − | + | Example with picture at below | |
| + | <gallery> | ||
| + | Gitlab url.png|URL for repository | ||
| + | </gallery> | ||
| + | git clone [URL of the git project] | ||
| + | Example: git clone https://gitlab.com/valsetech/blinq-fashion-web/tree/develop.gitlab | ||
| + | For your project depends on the url in gitlab(check from Gitlab). | ||
| + | Click enter. | ||
| − | + | 3. Then go to project repository folder(Still use the Git Bash): | |
| − | + | The command for opening project repository inside Git Bash check below | |
| + | cd blinq-fashion-web // This is for example, follow your project repository name. | ||
| + | Click enter. | ||
| − | + | 4. Then switch to “develop” branch: | |
| − | git checkout | + | <gallery> |
| + | Gitlab branch.png|Branches | ||
| + | </gallery> | ||
| + | There is more than 1 branches. | ||
| + | Master Branch is for the lead developer. | ||
| + | Develop Branch is for developer. | ||
| + | Member-section is for all member(can pull from this section). | ||
| + | git checkout develop | ||
| + | Click enter. | ||
| − | + | 5. Then create new branch, let call this branch “member-section”: (you can do this in Git Bash or Atom) | |
| − | git | + | git checkout -b member-section |
| − | + | 6. Publish this branch so that other member can also access it: | |
| − | git | + | git push --set-upstream origin member-section |
| − | + | 7. When you finish a feature and '''want to merge with latest code''', please do: | |
| − | git push | + | git pull origin develop |
| + | |||
| + | Then: | ||
| + | git push | ||
Revision as of 03:54, 23 August 2019
START HERE :
1. Open Git Bash
We assume that you have Gitlab account and have install Git.
Open Git Bash. Do all these in Git Bash command prompt:
Example with picture below
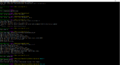
Git Bash Command Prompt

The command for Git Bash:
1. First, config your git credential:
git config --global user.name “John Doe” // Follow your Gitlab username
git config --global user.email johndoe@valse.com.my // Follow your Gitlab email/valse email
Click enter.
2. Then checkout git repository of our project(in Gitlab):
Example with picture at below
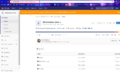
URL for repository

git clone [URL of the git project]
Example: git clone https://gitlab.com/valsetech/blinq-fashion-web/tree/develop.gitlab
For your project depends on the url in gitlab(check from Gitlab).
Click enter.
3. Then go to project repository folder(Still use the Git Bash):
The command for opening project repository inside Git Bash check below
cd blinq-fashion-web   // This is for example, follow your project repository name.
Click enter.
4. Then switch to “develop” branch:
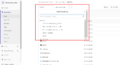
Branches

There is more than 1 branches.
Master Branch is for the lead developer.
Develop Branch is for developer.
Member-section is for all member(can pull from this section).
git checkout develop
Click enter.
5. Then create new branch, let call this branch “member-section”: (you can do this in Git Bash or Atom)
git checkout -b member-section
6. Publish this branch so that other member can also access it:
git push --set-upstream origin member-section
7. When you finish a feature and want to merge with latest code, please do:
git pull origin develop
Then:
git push