How To Use Gitlab Push, Pull And More
Revision as of 06:45, 23 August 2019 by Faiz.kwong (talk | contribs)
START HERE :
1. Open Git Bash
We assume that you have Gitlab account and have install Git.
Open Git Bash. Do all these in Git Bash command prompt:
Example with picture below

Git Bash Command Prompt

The command for Git Bash:
1. First, config your git credential:
git config --global user.name “John Doe” // Follow your Gitlab username
git config --global user.email johndoe@valse.com.my // Follow your Gitlab email/valse email
Click enter.
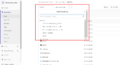
2. Then checkout git repository of our project(in Gitlab):
Example with picture at below

URL for repository

git clone [URL of the git project]
Example: git clone https://gitlab.com/valsetech/blinq-fashion-web/tree/develop.gitlab
For your project depends on the url in gitlab(check from Gitlab).
Click enter.
3. Then go to project repository folder(Still use the Git Bash):
The command for opening project repository inside Git Bash check below
cd blinq-fashion-web   // This is for example, follow your project repository name.
Click enter.
4. Then switch to “develop” branch(Still use the Git Bash):
Branches

There is more than 1 branches.
Master Branch is for the lead developer.
Develop Branch is for developer.
Member-section is for all member(can pull from this section).
Command for switching to 'develop' branch at below
git checkout develop
Click enter.
5. Then create new branch, let call this branch “member-section”: (you can do this in Git Bash or Atom)
git checkout -b member-section
Click enter.
6. Publish this branch so that other member can also access it:
git push --set-upstream origin member-section
Click enter.
7. When you finish a feature and want to merge with latest code, please do:
git pull origin develop
Click enter.
Then:
git push
Click enter.
2. To Push Using Atom IDE
To push project into Gitlab using Atom, need to open Atom > File > Add project folder > Search your project inside Repository. Picture at below
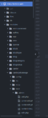
Atom project folder
You need to click the file.php to stage the project. Picture is below
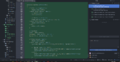
Git stage

You need to stage all file before commit to your branch.